Saturday, July 23, 2016

Part 6: MCI JH110B Rebuild - Done! Time for the rap-up!

By Tim Dolbear
www.timdolbear.com


It's Done!   Long road, but it's done and sounds amazing! Mixes sound like a record! I am totally sold on mixing to Analog tape.

Doing the final setup with the MRL was a challenge, not the normal alignment part but I had to setup everything such as erase depth, Rec Lin, Bias Freq... So it was an all day and evening thing... But Its now done and running amazingly.

Total cost... (not to mention the hours spent)
$2438.59 (original unit w/shipping was $749)

Thanks for following along. Here is links to all the installments.

The Adventure Begins

Part 1 Rebuild the rack and replace all the IC sockets...

Part 2 Re-assembly

Part 3 Rebuilding all the Molex Connectors.

Part 4 We Got Sound!

Part 4 Smoke in the studio!

Part 5 The final Stretch!


Friday, July 15, 2016

Part 5: MCI JH110B Rebuild - Final Stretch...

By Tim Dolbear
www.timdolbear.com


The Sony MCI JH-110B Rebuld Saga...

Just finished re-cap'ing the audio penthouse. Audio is much more stable sounding and feeling. Operations are smooth and how they should be.  We just ordered the MRL alignment tape from MARA Machines ( They are the kings of rebuilding MCI machines). Once the tape arrives we will do final alignment and setup and we are done!

We do have 2 remaining little fixes we need to address that will not stop us from using the machine in the meantime:

First there is still the transport issue that when the small board/joystick for the MVC is connected, the Rewind and FF buttons will not trigger the motors. The lifter will go, lights changed, but no movement. I can RR and FF using the Joystick just fine. When I unplug the MVC, RR and FF work perfectly BUT the digital count then does not work anymore and sits at 0.10... I do not need the MVC, but would like the RTZ and counter to operate.  Anyone have an idea?

Second, the channel 1 input into the Audio Penthouse, the connector can loose contact even though its screwed into place, something breaks contact when I open and close the drawer... simple fix, just annoying.

But right now we can print to tape and playback and the machine is not even bias/aligned, so good sign!

That's all for now, till next update!


Wednesday, July 6, 2016

Part 4: MCI JH110B Rebuild - Smoke in the studio!!!

By Tim Dolbear
www.timdolbear.com


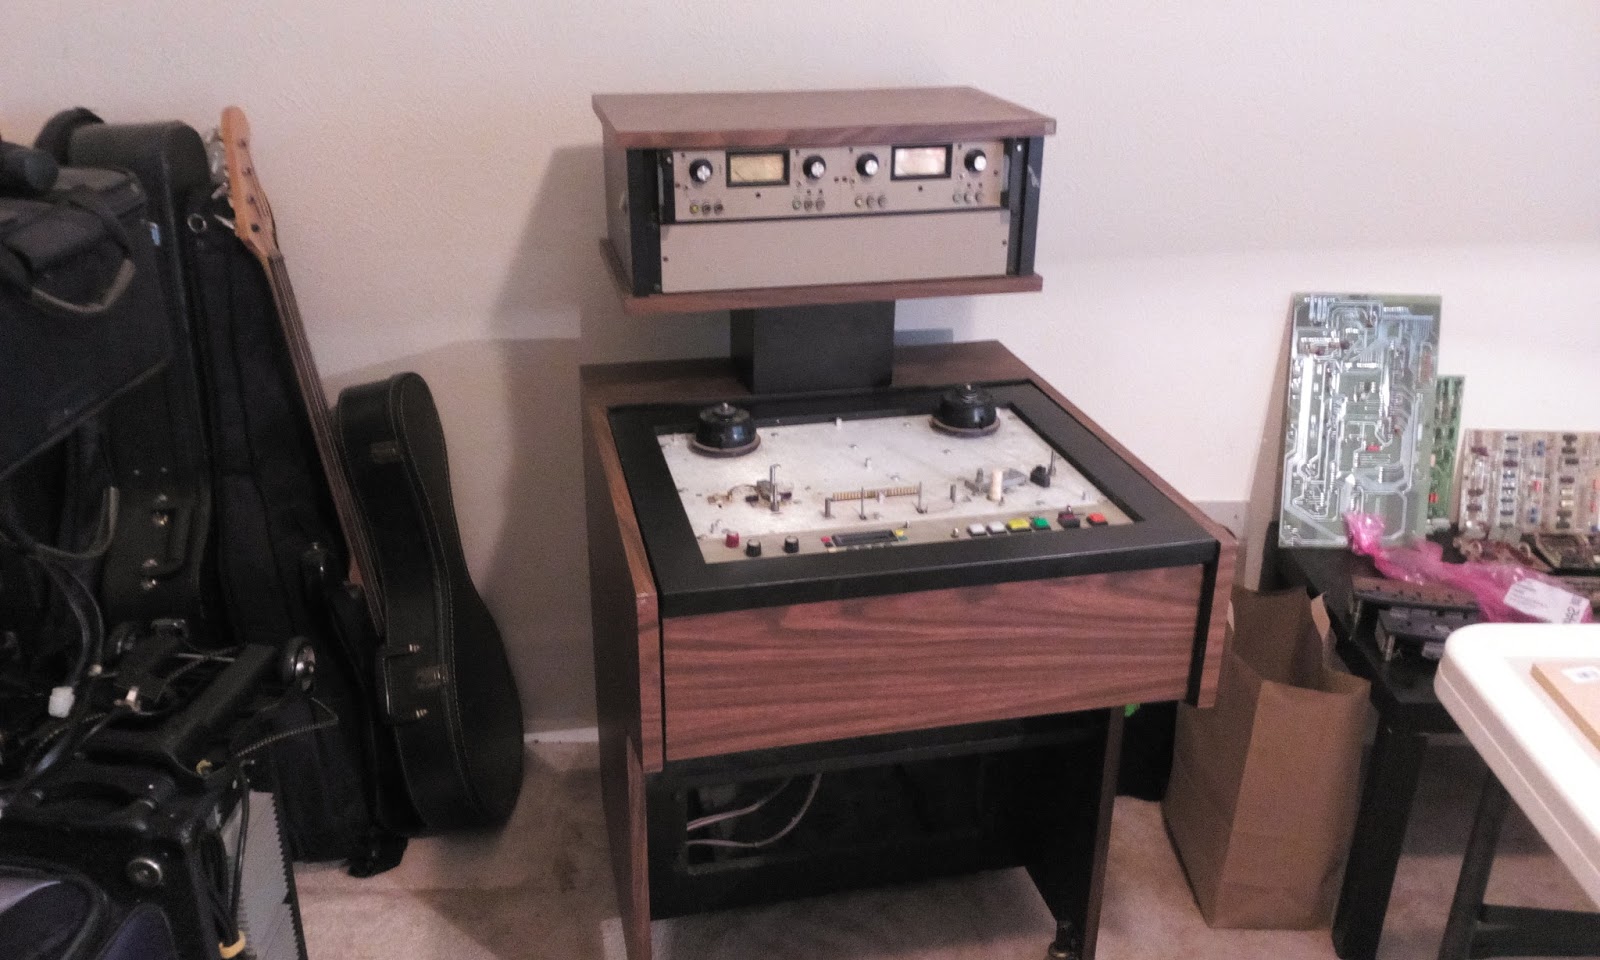
So... first the good. I built the switching system to allow me to route to/thru/from the JH110B tape machine, adding it to the signal path of the Mix Buss.

I decided to do a switching system and not a patchbay as I am not a fan of patchbays or connectors.

See my blog about connectors and patchbays: http://timdolbear.blogspot.com/2015/05/cables-connectors-patch-bays-pedals-and.html


I also decided to do a terminal connection instead of XLR ins/outs. Connectors just have such a small point of contact verses terminals.

I did a test measurement prior to adding the switching system,  I figured the first thing many would think was the same thing I thought about; will it add noise or a loss of sound quality?


 Adding the Switcher into the signal path, only added 1 balanced cable to my mix buss signal path when its going straight through, meaning no tape machine in line:  Mytek D/A feeding the GR EQ-2NV (in Bypass for the test) into the Manley Mastering Edition Variable Mu into the switcher, out to the Apogee A/D. Of course it added to it all the wiring for the Switcher box.

Crazy as it seems, My noise floor went down from -82.6 db to -83.7 db and my volume back into the DAW from the mix buss is .2db louder.  I can not explain it as all the cables are the same except for the 1 new 3ft balanced cable added between the Manley and the Switcher.  It may be the difference between the Variable Mu being warmed up for 1 hour verses 4 hours. (first test was at noon, 2nd was at 4pm).  Regardless, sound perfect and did not add any noise issues.


While then testing the route to the tape machine, setting levels, and working with a TC Electronics Volume Pilot that is inline between the tape machine and the monitor send, audio was working nicely on the JH110B, still not bias/aligned, but passing sound both in INPUT and REPRO (while Recording) modes. Suddenly a bad sound came through the right side speakers, and smoke poured out of the Audio Penthouse of the JH110B. I quickly killed power to the JH110B and opened the door for some fresh air...

Another Resister blew, this time one on the 18v input to the I/O card for the right side or Ch2.  I checked the 2 tantalum caps that are inline with it and booth are dead shorted now... good grief!

At this point I will of course replace the resister but also plan to replace all the tantalum caps on the audio boards (repro, rec, bias, I/O).  Fun!  But apparently needed since I have so many bad and going bad daily.


Till next time!


Friday, July 1, 2016

Part 4: MCI JH110B Rebuild - We Got Sound!

By Tim Dolbear
www.timdolbear.com


A bad cap on the left channel's Repro Board was causing a resistor to blow spectacularly and with both parts fix and the IC that they supplied -18v to also replaced for good measure, we have sound!

And even at this point it sounds COOL!


Big thanks for the help of Dan Hembree, my wife's brother, who used to work at Rupert Neve Designs and now owns https://crimsonaudio.com/

The machine is not setup yet correctly for Bias/levels so we are running it with the settings the old owners had for the tape they were using, but we are able to record and listen back to tape! New MRL tape should be here in a couple weeks for final setup.

One last issue we are tracking down is that the transport controls still are acting up; FF and RW work perfectly, then the motors stop responding to the buttons, again, the lifters still worked. The joystick still RW and FW but the motors will not moved when pressing RW or FF.  Also the stop sometimes will not stop playback meaning when you push the stop bottom the machine stops, but releasing the stop button and play resumes.

While trouble shooting I unplugged the MVC (Joystick shuttle) board and now the controls are all solid. I suspect the sensitivity is set too high and its triggering something or simply there is a bad part.  I will not use the MVC but without it's little board plugged in, the RTZ no logger works. so...

Next I need to build the switching system that will allow me to add the JH110B into the Mixbuss Loop I use while mixing, and allow for playback to the DAW or straight to the monitoring. I am not a fan of patchbays, and thus the switching system. Stay tuned.

On ward!


Tuesday, June 28, 2016

Part 3 : MCI JH110B rebuild - Update June 27, 2016 We got spin!

By Tim Dolbear
www.timdolbear.com


I had tons of Molex connection issues and after cleaning and tweaking them endlessly we got Spin!

Also the RTZ works. Have yet to test storing locator points but RTZ was the main thing.


I placed a old trash real and the old head stack back on so the old tape would not gum up the new ones. I was worried about snapping the tape on first test. Also I have torque settings to do still.

The transport worked ok but seemed shaky, then after a few days of checking it the FF and RW stopped, the lifters still worked, and the joystick still RW and FW but the motors will not moved when pressing RW or FF.  So its all bad Molex connections.

So I took apart EVERY Molex connector, popped the pins out really, and reshaped and cleaned each pin to bring the connectors full back to life, about 200 pins I estimate. 6 hours later everything runs so much more solid!

Next is the Audio Drawer of DEATH!!!  That's right, no sound even passing on channel 1 and channel 2 shows -20db twitching.

Time to shuffle cards and see if I can find the bad boards then on to fixing 'em.


Sunday, June 12, 2016

Part 2 : MCI JH110B rebuild - Update June 12, 2016

By Tim Dolbear
www.timdolbear.com

Part 2,  Soldering is done, time to clean and put back it back together and test.


The headstack is due back from JRF in a few days. $580! ...basically a new headstack: 2 heads replaced and 1 relapped, Flutter cleansed and all optically aligned...Oh and a new block.
Ouch!  But at least it will be stellar!


So the replacement of the sockets, is done. I replaced most all the chips with new ones. I also went through and re-soldered every Molex connection on the boards, so every pin...about 1000 of them... Then cleaned every connector and connection.


I reassembled the motherboard and daughter boards while looking at the picture I took during disassembly.  You can see my tablet below the Deck.


With everything back together I was able to place it in the studio even though I need to rebuild the Power supply which had showed weak measurements for the 22volt regulators (only 6v), Powering up the unit, nothing works. The right channel showered a pegged level (oscillating?) and the right side did not... the VU on the right does not light up but the buttons do, so it has power...  more fun, but really I can't know for sure or deal with those issues until I fix the power supply. Then I can test again. Also the heads will be back then.


But it looks so good in the studio!!!


Monday, May 23, 2016

Part 1, Eclectica Studio's MCI JH110B rebuild report May 22, 2016

By Tim Dolbear
www.timdolbear.com

Part 1,  ...and so it begins!

The first thing we needed to do was strip the unit completely. I removed the deck from the rack or "furniture part" and then removed all the circuit boards and motherboard. I then removed the rack mounting system so I could cut new pieces to use to mount the rack rails to the 'Furniture'.  I also removed the face plate from the deck to I could unscrew it from the rack rails, and also clean under the face plate.


In the picture you can see the white strips of wood which are the new pieces. The rack rails mount to this new wood and the entire part attaches to the square black frame, which then mounts into the furniture and is able to rotate allowing for access to the circuitry.


 I also mounted the Penthouse or 4-space rack that houses the 2 channels of In/Out circuitry.  Now it's looking like it supposed to...


And then I started on the electronics.

All the red IC sockets need to be replaced and all the Molex connectors need to be resoldered to fix any cold solder connections to the boards. The very first IC socket took me 30 minutes to remove, it shattered into 30 pieces...
I thought "oh no, this is going to take forever! I have 50+ red IC sockets to replace!"  But the next one took 3 minutes to remove and the rest took 2min to remove, clean the IC and replace. 


Here is a before and after of the first board done and the old sockets.


This week the head stack goes off for relapping, I swapped out the block, the black top of the assembly, so my good stack, which came with the JH110B had the nice block.  I had bought a 
head stack off of eBay simply for the nicer looking block. The heads are in almost perfect condition but JRF will optically align the head stack and if they feel they need relapping, they shall do that too.