By Tim Dolbear
www.timdolbear.com
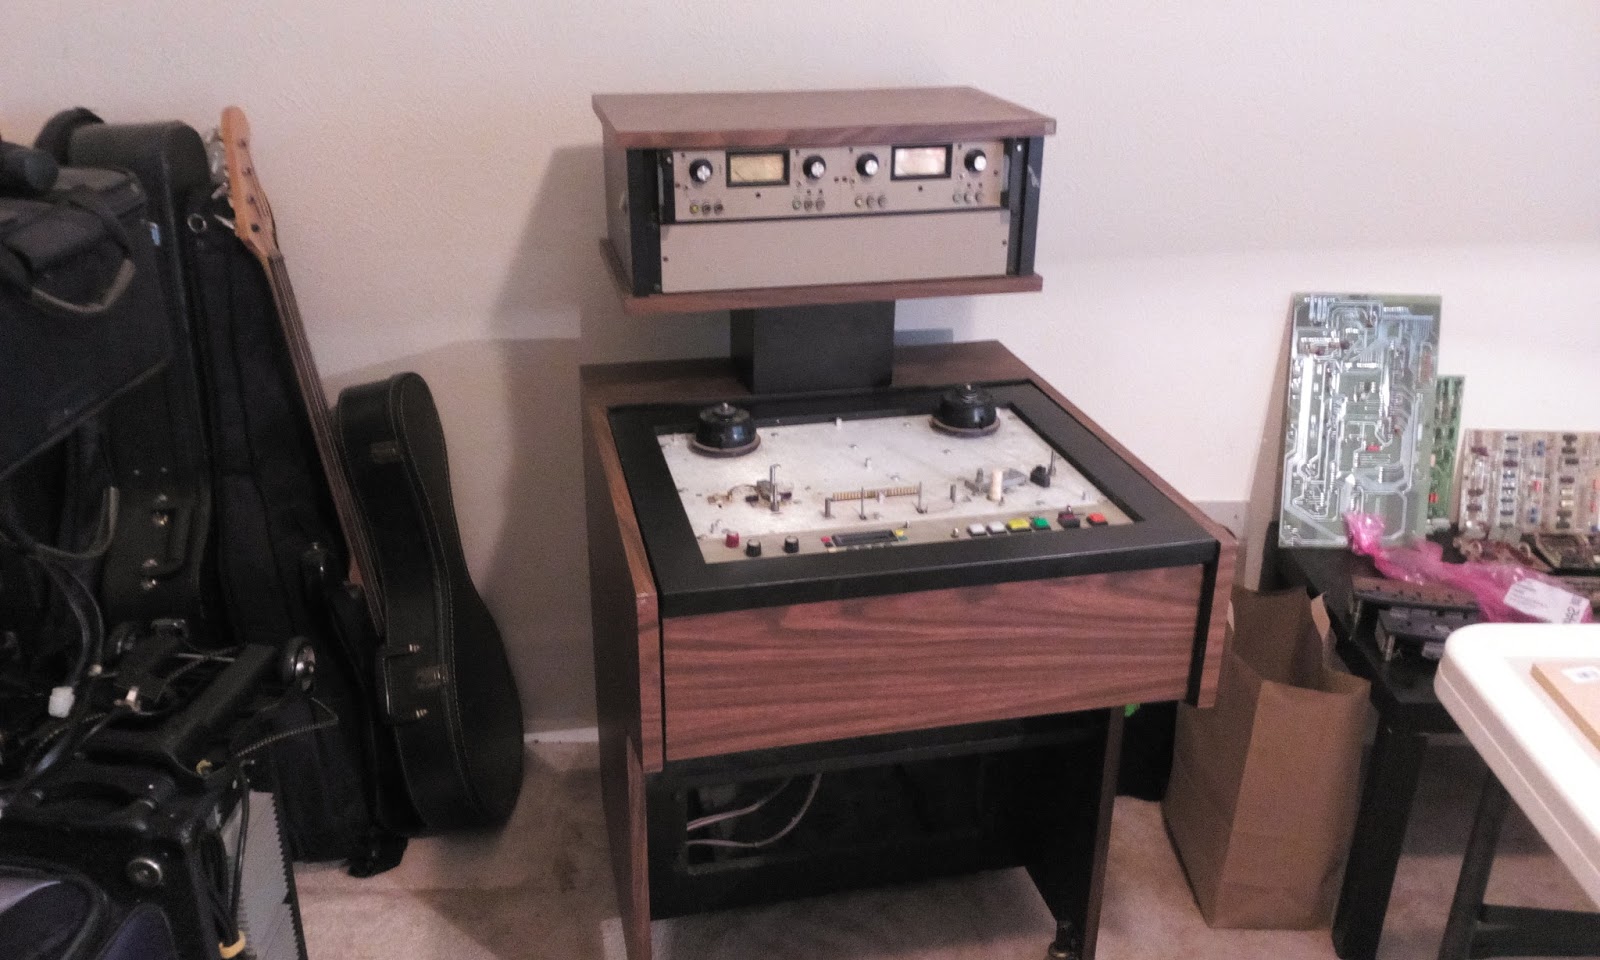
A bad cap on the left channel's Repro Board was causing a resistor to blow spectacularly and with both parts fix and the IC that they supplied -18v to also replaced for good measure, we have sound!
And even at this point it sounds COOL!
Big thanks for the help of Dan Hembree, my wife's brother, who used to work at Rupert Neve Designs and now owns https://crimsonaudio.com/
The machine is not setup yet correctly for Bias/levels so we are running it with the settings the old owners had for the tape they were using, but we are able to record and listen back to tape! New MRL tape should be here in a couple weeks for final setup.
One last issue we are tracking down is that the transport controls still are acting up; FF and RW work perfectly, then the motors stop responding to the buttons, again, the lifters still worked. The joystick still RW and FW but the motors will not moved when pressing RW or FF. Also the stop sometimes will not stop playback meaning when you push the stop bottom the machine stops, but releasing the stop button and play resumes.
While trouble shooting I unplugged the MVC (Joystick shuttle) board and now the controls are all solid. I suspect the sensitivity is set too high and its triggering something or simply there is a bad part. I will not use the MVC but without it's little board plugged in, the RTZ no logger works. so...
Next I need to build the switching system that will allow me to add the JH110B into the Mixbuss Loop I use while mixing, and allow for playback to the DAW or straight to the monitoring. I am not a fan of patchbays, and thus the switching system. Stay tuned.
On ward!
Music mixing engineer, record engineer and producer, musician and writer Tim Dolbear gives advice on everything from recording studio production and music creation to life lessons learned.
Friday, July 1, 2016
Tuesday, June 28, 2016
Part 3 : MCI JH110B rebuild - Update June 27, 2016 We got spin!
By Tim Dolbear
www.timdolbear.com
I had tons of Molex connection issues and after cleaning and tweaking them endlessly we got Spin!
Also the RTZ works. Have yet to test storing locator points but RTZ was the main thing.
I placed a old trash real and the old head stack back on so the old tape would not gum up the new ones. I was worried about snapping the tape on first test. Also I have torque settings to do still.
The transport worked ok but seemed shaky, then after a few days of checking it the FF and RW stopped, the lifters still worked, and the joystick still RW and FW but the motors will not moved when pressing RW or FF. So its all bad Molex connections.
So I took apart EVERY Molex connector, popped the pins out really, and reshaped and cleaned each pin to bring the connectors full back to life, about 200 pins I estimate. 6 hours later everything runs so much more solid!
Next is the Audio Drawer of DEATH!!! That's right, no sound even passing on channel 1 and channel 2 shows -20db twitching.
Time to shuffle cards and see if I can find the bad boards then on to fixing 'em.

www.timdolbear.comI had tons of Molex connection issues and after cleaning and tweaking them endlessly we got Spin!
Also the RTZ works. Have yet to test storing locator points but RTZ was the main thing.
I placed a old trash real and the old head stack back on so the old tape would not gum up the new ones. I was worried about snapping the tape on first test. Also I have torque settings to do still.The transport worked ok but seemed shaky, then after a few days of checking it the FF and RW stopped, the lifters still worked, and the joystick still RW and FW but the motors will not moved when pressing RW or FF. So its all bad Molex connections.
So I took apart EVERY Molex connector, popped the pins out really, and reshaped and cleaned each pin to bring the connectors full back to life, about 200 pins I estimate. 6 hours later everything runs so much more solid!
Next is the Audio Drawer of DEATH!!! That's right, no sound even passing on channel 1 and channel 2 shows -20db twitching.
Time to shuffle cards and see if I can find the bad boards then on to fixing 'em.

Sunday, June 12, 2016
Part 2 : MCI JH110B rebuild - Update June 12, 2016
Part 2, Soldering is done, time to clean and put back it back together and test.
The headstack is due back from JRF in a few days. $580! ...basically a new headstack: 2 heads replaced and 1 relapped, Flutter cleansed and all optically aligned...Oh and a new block.
Ouch! But at least it will be stellar!
So the replacement of the sockets, is done. I replaced most all the chips with new ones. I also went through and re-soldered every Molex connection on the boards, so every pin...about 1000 of them... Then cleaned every connector and connection.
I reassembled the motherboard and daughter boards while looking at the picture I took during disassembly. You can see my tablet below the Deck.
With everything back together I was able to place it in the studio even though I need to rebuild the Power supply which had showed weak measurements for the 22volt regulators (only 6v), Powering up the unit, nothing works. The right channel showered a pegged level (oscillating?) and the right side did not... the VU on the right does not light up but the buttons do, so it has power... more fun, but really I can't know for sure or deal with those issues until I fix the power supply. Then I can test again. Also the heads will be back then.
But it looks so good in the studio!!!
The headstack is due back from JRF in a few days. $580! ...basically a new headstack: 2 heads replaced and 1 relapped, Flutter cleansed and all optically aligned...Oh and a new block. Ouch! But at least it will be stellar!
So the replacement of the sockets, is done. I replaced most all the chips with new ones. I also went through and re-soldered every Molex connection on the boards, so every pin...about 1000 of them... Then cleaned every connector and connection.
I reassembled the motherboard and daughter boards while looking at the picture I took during disassembly. You can see my tablet below the Deck.
With everything back together I was able to place it in the studio even though I need to rebuild the Power supply which had showed weak measurements for the 22volt regulators (only 6v), Powering up the unit, nothing works. The right channel showered a pegged level (oscillating?) and the right side did not... the VU on the right does not light up but the buttons do, so it has power... more fun, but really I can't know for sure or deal with those issues until I fix the power supply. Then I can test again. Also the heads will be back then.But it looks so good in the studio!!!
Monday, May 23, 2016
Part 1, Eclectica Studio's MCI JH110B rebuild report May 22, 2016
By Tim Dolbear
www.timdolbear.com
www.timdolbear.com
Part 1, ...and so it begins!
The first thing we needed to do was strip the unit completely. I removed the deck from the rack or "furniture part" and then removed all the circuit boards and motherboard. I then removed the rack mounting system so I could cut new pieces to use to mount the rack rails to the 'Furniture'. I also removed the face plate from the deck to I could unscrew it from the rack rails, and also clean under the face plate.
In the picture you can see the white strips of wood which are the new pieces. The rack rails mount to this new wood and the entire part attaches to the square black frame, which then mounts into the furniture and is able to rotate allowing for access to the circuitry.
I also mounted the Penthouse or 4-space rack that houses the 2 channels of In/Out circuitry. Now it's looking like it supposed to...
And then I started on the electronics.
I thought "oh no, this is going to take forever! I have 50+ red IC sockets to replace!" But the next one took 3 minutes to remove and the rest took 2min to remove, clean the IC and replace.
This week the head stack goes off for relapping, I swapped out the block, the black top of the assembly, so my good stack, which came with the JH110B had the nice block. I had bought a
head stack off of eBay simply for the nicer looking block. The heads are in almost perfect condition but JRF will optically align the head stack and if they feel they need relapping, they shall do that too. Sunday, May 15, 2016
The Adventure of the Eclectica Studios' MCI JH110B 1/4" Mastering deck.
By Tim Dolbear
www.timdolbear.com
Our new MCI JH110B 1/4" Mastering Deck has arrived! The unit works but I want it brought back to spec and update all the things that a 1979 unit should have, and needs to have, updated and addressed.
Over the next month or two I will be completely refurbishing our new MCI JH110B. If you want to follow along. Subscribe to my blog!
The unit was damaged a little in shipping, the wood supports that hold the Deck to the housing split and the unit bounced inside the rack bending a metal support holding the motherboard. So that's the first thing I will be fixing. Since all the circuit boards need to come off for recap/socket replacement and so on, I will strip the unit and fix the supports so I can rebuild it as the pieces are recapped and fixed up.

This unit has the horrible Red IC sockets still on only about 1/2 of the motherboards, The ICs just fall out of them. The unit looks like it was maintained well and many things fixed in the late 1990's.
So new sockets, recapping and reseating the Molex connectors all need to be done. I need to also go through the Power Supply and clean every square inch of every thing. The unit works but I want it brought back to spec and update the things a 1979 unit should have and needs to have updated.
The 2 head stacks I have are both off to JRF this week. JRF had relapped the heads once before as their sticker and info are on them. The Erase head has a small chip out of the face, not where tape touches, If JRF decides its an issue we have a 2nd spare head stack we can pull parts from.
This is a picture of The Landcaster Opera House in Buffalo, NY. We believe this MCI 1/4" lived and worked here from 1979 until put into storage around 2000. The unit was then purchased by an engineer 10 years later who was going to restore it and never got time to. Now its here at Eclectica Studios in Austin Tx.
www.timdolbear.com
Our new MCI JH110B 1/4" Mastering Deck has arrived! The unit works but I want it brought back to spec and update all the things that a 1979 unit should have, and needs to have, updated and addressed.
Over the next month or two I will be completely refurbishing our new MCI JH110B. If you want to follow along. Subscribe to my blog!
The unit was damaged a little in shipping, the wood supports that hold the Deck to the housing split and the unit bounced inside the rack bending a metal support holding the motherboard. So that's the first thing I will be fixing. Since all the circuit boards need to come off for recap/socket replacement and so on, I will strip the unit and fix the supports so I can rebuild it as the pieces are recapped and fixed up.

This unit has the horrible Red IC sockets still on only about 1/2 of the motherboards, The ICs just fall out of them. The unit looks like it was maintained well and many things fixed in the late 1990's.So new sockets, recapping and reseating the Molex connectors all need to be done. I need to also go through the Power Supply and clean every square inch of every thing. The unit works but I want it brought back to spec and update the things a 1979 unit should have and needs to have updated.
The 2 head stacks I have are both off to JRF this week. JRF had relapped the heads once before as their sticker and info are on them. The Erase head has a small chip out of the face, not where tape touches, If JRF decides its an issue we have a 2nd spare head stack we can pull parts from.
This is a picture of The Landcaster Opera House in Buffalo, NY. We believe this MCI 1/4" lived and worked here from 1979 until put into storage around 2000. The unit was then purchased by an engineer 10 years later who was going to restore it and never got time to. Now its here at Eclectica Studios in Austin Tx.
Friday, April 1, 2016
Sound Experience with Tim Dolbear on EnterTalkRadio
By Tim Dolbearwww.timdolbear.com
The Launch of Sound Experience with Tim Dolbear on EnterTalkRadio!
April 4th, 2016
Monday April 4th at 7pm Eastern(4pm Pacific) we kick off my first live weekly radio show and our special guest will be world renown Grammy nominated Master Engineer and Record Label owner Michael Romanowski.
The show will air Live on EnterTalkRadio.com, please check http://entertalkradio.com/#events for more...
After the live airing of the show, you can then listen to the show anytime, just go to our show page and listening under the "Shows On Demand" area at http://entertalkradio.com/soundexperience/
Shows will be available for one year and, I believe, the shows are also available as a podcast on iTunes too.
Since the shows are live and always will feature a special guest, we will have listener call ins to ask questions live on the air. You can also submit questions on our FaceBook page: https://www.facebook.com/soundexperienceradio/
Here is our tentative schedule of guest for April:
April 4th, Michael Romanowski
April 11th, Legendary rock singer of TNT and Skid Row, Tony Harnell
April 18th, Mix engineer and producer Ross Hogarth
April 25th, Audio engineer and recording Professor at The BlackBird Academy Mark Rubel
I look forward to having a lot of fun with this, and believe we can all learn from each others vast range of experiences.
Wednesday, March 16, 2016
Attack of the Expanding Blog! We are going Live on the radio and podcast! "Sound Experience with Tim Dolbear"
By Tim Dolbear
www.timdolbear.com
www.timdolbear.com
Today we are signing papers to bring an expanded version of my blog to EnterTalk Radio
We will be starting next month the new show "Sound Experience with Tim Dolbear." This is a live show, hosted by me with special guest every week form the world of recording; Famous Producers, Musicians, Audio Gurus, Equipment Designers... And during the live show, you can call in and ask questions, or email them in prior to the show.
The show will be live and then available on the station's site as a Pod Cast and download.
I am very excited to be doing this adventure and can't wait to start! More info coming soon!
Subscribe to:
Posts (Atom)