Tim Dolbear
www.timdolbear.com
Last Friday I was in NYC and spent the day at Sony/Battery Studios located in the formal home of the Record Plant. I had a blast hanging out with the gang there. Everywhere you look was amazing history and vibe from years of amazing artist working in those rooms; John Lennon, Kiss, Aerosmith, Paul Simon, Jimi Hendrix, New York Dolls, and so many more.
Nowadays the studio is the mastering studio for Sony and its subsidiaries and they are not only master the new releases, but handle the transfer of the older music to digital for achieving. At one point Vic Anesini handed me a 1/4" reel in an old box, I flipped it over and it was the original master for many Elvis songs recorded in the early 1960's. Amazing!
That brings us to this:
Since records made during and just after WWII were made of lesser than quality ingredients, the lacquer is no longer sticking to its sub-frame and thus the album is falling apart. So in order to transfer in for achieving, they have to go to the original metal stamp that was made for record pressing... and this record player will play a metal stamp!
The table turns backwards and you use the arm on the left whose needle is an upside down "V" shape not a normal down facing point. Since not only does it spin backwards, but the the grooves are no longer valleys, but are mountains and the needle has to straddle the the ridge. Dig?
It was amazing to check out as it is a one of a kind.
Btw, it lives in this room:
Music mixing engineer, record engineer and producer, musician and writer Tim Dolbear gives advice on everything from recording studio production and music creation to life lessons learned.
Wednesday, September 30, 2015
Wednesday, September 23, 2015
My Visit To Chez Boom Audio : Post Production - Deep in the Heart of Texas
By Tim Dolbear
www.timdolbear.com
In August, Argosy Console asked if I would visit Shayna Brown of Chez Boom Audio and write about their move to studio A at Tequila Mockingbird Studios. I hope you enjoy learning about:
In the center of Austin, just a few blocks west of the State Capital of Texas, is a studio rich with history and vibe called Tequila Mockingbird.
Known for hosting musicians from the Central Texas area such as Bob Schneider, Shawn Colvin, Dale Watson and so many others, this multi room studio compound has the look and feel that encompasses the charm that one hopes to find when you visit a studio located in such a music and film driven town. Tequila Mockingbird is also home to Emmy nominated and highly sought after audio engineer Shayna Brown’s Chez Boom Audio. In early August 2015, we got the opportunity to visit Chez Boom Audio and learn more about the workings of this post production professional.
Shayna Brown has worked with an amazing array of industry heavy-hitters throughout her years of work as an audio engineer doing voice over, film mixing, television and radio advertising, music editing and her specialty ADR or Automatic Dialog Replacement for film. ADR is the process of replacing the actors’ dialog that was recorded poorly while on location. Actors come to Chez Boom and redo their speaking parts.
Brown has hundreds of film and television credits including True Detective, Supernatural, Revolution, 12 Years A Slave, Gravity, Sideways, Once Upon A Time In Mexico…and the list goes on. A wide range of work that shows she is at the top of her game. But let’s step back a few years to when a 15-year-old Shayna Brown landed herself an internship at Tequila Mockingbird Studios.
“My father is a musician so I grew up in studios and so it’s very familiar for me. When my dad was in the studio, I would just go with him and help him out,” Brown said. “Then I started interning at Tequila Mockingbird Studios and I thought that I wanted to be a music engineer, but I didn’t like the late nights and music recording just wasn’t for me.”
Digital audio was just emerging as the new standard while Brown was studying at the University of Texas. “Back before it was even called Protools I started taking classes for it and my father’s friends started calling me saying ‘Hey, I’ll pay you to give me a lesson, how does this stuff work?’ And I kinda got into it that way,” Brown said.
“What then changed me from music to film is that film director Robert Rodriguez came to town and he did not have a studio to do ADR. So he set up with the basics we had here at the time at Tequila Mockingbird and his people came in for the session but I ran the board. His people showed me how to set up a session and how to do ADR,” Brown said.
“I was also working with Matthew McConaughey on a TXDOT spot and he needed ADR too, and I thought, hey I now know how to do this. Between him and Robert, the LA studios felt comfortable using me for their ADR needs.
“My work nowadays is split, half the time on ADR and half on post production, Radio and TV stuff, sound effects and music editing, which is also fun. I like how quick these types of projects go, I am not on any one project for more than a few days. I’m in a really cool city, which is a hotspot now for film and TV production,” Brown said.
Chez Boom Audio interconnects to the film and TV studios in Los Angeles and beyond via ISDN connection allowing for sessions to be “attended” and worked on from anywhere. For the ISDN feeds and monitoring CUE setups, she uses a Mackie 1604 mixer.
“Most people when they do ADR do not want anything more than just a microphone and a mic pre and that’s it,” Brown said. “I use a Grace Designs 2 channel mic pre for ADR but also have available mic preamps from API and the AVID HD Omni 2 channel preamp.” Other pieces of studio kit include a Manley Vari-mu Compressor and large LCD flat panel screens for video overlay.
In 2015, Chez Boom Audio moved its base of operations to a bigger room at the Tequila Mockingbird Studio Complex. “The move was just because I had finally outgrown that old room,” Brown said. “I was doing enough big, high profile ADR work that it seemed like the time to upgrade my room to match the work.”
The new studio has now been remodeled in a comfortable setup to match Brown and her clients’ workflow, with both a large live room and vocal booth, both with line of sight to the control room, as well as a client office just off the control room.
“The Argosy console is awesome, I think it looks like a starship. It was an easy choice to make coming from a no frills wood desk that was basically a table.” Purchased at the recommendation of friends and assembled by herself, the Argosy Dual 15 Workstation console is the centerpiece of the control room and lends a classy and professional tone to the entire studio image and workflow.
Chez Boom’s new live room can now accommodate all types of sessions, with movable sound baffles used to setup areas for ADR and voice over sessions. This allows the room to be scaled to the needs of the session. This is a great workflow solution as it allows for the area to accommodate from a single actor to a round table Podcast, and expanding it outward into the room allow for any combination of artist and even bands to work comfortably.
The main ADR setup includes a large LCD screen for playback and a clear line of sight to the control room. The mic selection consists of a Sennheiser MKH 416 microphone, the standard and most ask for mic for ADR work, and a Lavalier mic for backup, while a Neumann TLM 103 handles the voice version duties.
We had a lot of fun meeting Shayna Brown and touring Chez Boom Audio. For more information, check out Chez Boom’s website http://www.chezboomaudio.com
www.timdolbear.com
In August, Argosy Console asked if I would visit Shayna Brown of Chez Boom Audio and write about their move to studio A at Tequila Mockingbird Studios. I hope you enjoy learning about:
Post Production - Deep in the Heart of Texas
Shayna Brown’s Chez Boom Audio and Argosy
In the center of Austin, just a few blocks west of the State Capital of Texas, is a studio rich with history and vibe called Tequila Mockingbird.
Known for hosting musicians from the Central Texas area such as Bob Schneider, Shawn Colvin, Dale Watson and so many others, this multi room studio compound has the look and feel that encompasses the charm that one hopes to find when you visit a studio located in such a music and film driven town. Tequila Mockingbird is also home to Emmy nominated and highly sought after audio engineer Shayna Brown’s Chez Boom Audio. In early August 2015, we got the opportunity to visit Chez Boom Audio and learn more about the workings of this post production professional.
Shayna Brown has worked with an amazing array of industry heavy-hitters throughout her years of work as an audio engineer doing voice over, film mixing, television and radio advertising, music editing and her specialty ADR or Automatic Dialog Replacement for film. ADR is the process of replacing the actors’ dialog that was recorded poorly while on location. Actors come to Chez Boom and redo their speaking parts.
Brown has hundreds of film and television credits including True Detective, Supernatural, Revolution, 12 Years A Slave, Gravity, Sideways, Once Upon A Time In Mexico…and the list goes on. A wide range of work that shows she is at the top of her game. But let’s step back a few years to when a 15-year-old Shayna Brown landed herself an internship at Tequila Mockingbird Studios.
“My father is a musician so I grew up in studios and so it’s very familiar for me. When my dad was in the studio, I would just go with him and help him out,” Brown said. “Then I started interning at Tequila Mockingbird Studios and I thought that I wanted to be a music engineer, but I didn’t like the late nights and music recording just wasn’t for me.”
Digital audio was just emerging as the new standard while Brown was studying at the University of Texas. “Back before it was even called Protools I started taking classes for it and my father’s friends started calling me saying ‘Hey, I’ll pay you to give me a lesson, how does this stuff work?’ And I kinda got into it that way,” Brown said.
“What then changed me from music to film is that film director Robert Rodriguez came to town and he did not have a studio to do ADR. So he set up with the basics we had here at the time at Tequila Mockingbird and his people came in for the session but I ran the board. His people showed me how to set up a session and how to do ADR,” Brown said.
“I was also working with Matthew McConaughey on a TXDOT spot and he needed ADR too, and I thought, hey I now know how to do this. Between him and Robert, the LA studios felt comfortable using me for their ADR needs.
“My work nowadays is split, half the time on ADR and half on post production, Radio and TV stuff, sound effects and music editing, which is also fun. I like how quick these types of projects go, I am not on any one project for more than a few days. I’m in a really cool city, which is a hotspot now for film and TV production,” Brown said.
Chez Boom Audio interconnects to the film and TV studios in Los Angeles and beyond via ISDN connection allowing for sessions to be “attended” and worked on from anywhere. For the ISDN feeds and monitoring CUE setups, she uses a Mackie 1604 mixer.
“Most people when they do ADR do not want anything more than just a microphone and a mic pre and that’s it,” Brown said. “I use a Grace Designs 2 channel mic pre for ADR but also have available mic preamps from API and the AVID HD Omni 2 channel preamp.” Other pieces of studio kit include a Manley Vari-mu Compressor and large LCD flat panel screens for video overlay.
In 2015, Chez Boom Audio moved its base of operations to a bigger room at the Tequila Mockingbird Studio Complex. “The move was just because I had finally outgrown that old room,” Brown said. “I was doing enough big, high profile ADR work that it seemed like the time to upgrade my room to match the work.”
The new studio has now been remodeled in a comfortable setup to match Brown and her clients’ workflow, with both a large live room and vocal booth, both with line of sight to the control room, as well as a client office just off the control room.
“The Argosy console is awesome, I think it looks like a starship. It was an easy choice to make coming from a no frills wood desk that was basically a table.” Purchased at the recommendation of friends and assembled by herself, the Argosy Dual 15 Workstation console is the centerpiece of the control room and lends a classy and professional tone to the entire studio image and workflow.
Chez Boom’s new live room can now accommodate all types of sessions, with movable sound baffles used to setup areas for ADR and voice over sessions. This allows the room to be scaled to the needs of the session. This is a great workflow solution as it allows for the area to accommodate from a single actor to a round table Podcast, and expanding it outward into the room allow for any combination of artist and even bands to work comfortably.
The main ADR setup includes a large LCD screen for playback and a clear line of sight to the control room. The mic selection consists of a Sennheiser MKH 416 microphone, the standard and most ask for mic for ADR work, and a Lavalier mic for backup, while a Neumann TLM 103 handles the voice version duties.
We had a lot of fun meeting Shayna Brown and touring Chez Boom Audio. For more information, check out Chez Boom’s website http://www.chezboomaudio.com
***
Monday, September 14, 2015
Your Team:The company you keep.
By Tim Dolbear
www.timdolbear.com
Over the last 30 years, since joining my first 'Pro' rock band, on through some touring, studio work and then on to owning Eclectica Studios and working full time as a producer for the last 16 years, I have learn a lot of things about people, musicians, egos, pride, and artist. I have learned a few thing about who we pick to work with, or your 'team'. I wanted to share a few things that I hope will help you out as you work in this strange industry full of musicians, producers, wannabees and professionals.
Who you choose to work with.
You have to remember that you do not have to work with the person you are currently working with, unless there is a gun to your head, you are free to move on. If its not working, cut and run. Or in a blink of the eye, 20 years will have gone by and the ship you hoped to be on will have sailed.
There is no time for drama, druggies, alcoholics, nut jobs, prima donna... And you need people who understand your vision and are at or above your level of talent. Above your level is really what you need to be striving for. Team members that are 'above' your level help you strive. Teaming up with people below you will usually drag you down to their level.
I understand that change is hard sometimes, but moving to a situation that fits you better is always worth it. And it can be quite inspiring too.
Choosing a studio engineer.
Find someone who gets you and your music and will put the time into achieving what you are paying them to do. If they are not the most knowledgeable person about what you are hiring them to do, don't hire them. Why would you? Their lack of knowledge will cost you money and time and cause all sorts of stresses.
Find someone with proper experience and not just credits. Gold records and a Grammy do not equal experience. I know, as a trainer for Sequoia now for 5+ years, I am still amazed at the lack of experience and knowledge some of the people I've trained have, yet they have Gold and Platinum albums hanging on the wall.
Once you have the right engineer, someone with knowledge and experience that fits your needs, let him do what he does best. A friend of mine is a doctor and told me all about patients coming into his office and telling him their diagnosis and what he needs to do, that they had read it on the internet... How absurd! If they thought he needed to be told what to do, why are they there? But it happens in the studio too. You need to trust the fact that the engineer you picked has the experience and know-how to do what you hired him or her to do.
Picking studio musicians and players.
I always say, let the professional do what they do best, and with session musicians and players you always get the best results by doing this.
For example, I give a drummer the basic grooves that I need him to lay down, then I let them do that voodoo that he do so well. This is what they do, and their enhancements to my basic ideas will be way better then what I could have envision, you know?
I have played guitar on hundreds of releases, you probably know my background. I was tracking an acoustic guitar solo on a song and the client instructed me to the point were it sounded like a horrible solo done with a keyboard. They even at one point said "I don't think it should be played like that, a guitar player wouldn't do that."
Other clients have brought me simple solos to redo that they had played but wanted done better, but then would not let me do anything other than note for note exact reproduction of what they did. Imagine what the song and solo could have been like if they had allowed me to do my thing.
I'll leave you with this.
Remember if you have chosen a person to be part of your team, you need to trust what they do, otherwise you really do not have a team and you will be unhappy and frustrated, along with frustrating everyone around you through out the project.
www.timdolbear.com
Who you choose to work with.
You have to remember that you do not have to work with the person you are currently working with, unless there is a gun to your head, you are free to move on. If its not working, cut and run. Or in a blink of the eye, 20 years will have gone by and the ship you hoped to be on will have sailed.
There is no time for drama, druggies, alcoholics, nut jobs, prima donna... And you need people who understand your vision and are at or above your level of talent. Above your level is really what you need to be striving for. Team members that are 'above' your level help you strive. Teaming up with people below you will usually drag you down to their level.
I understand that change is hard sometimes, but moving to a situation that fits you better is always worth it. And it can be quite inspiring too.
Choosing a studio engineer.
Find someone who gets you and your music and will put the time into achieving what you are paying them to do. If they are not the most knowledgeable person about what you are hiring them to do, don't hire them. Why would you? Their lack of knowledge will cost you money and time and cause all sorts of stresses.
Find someone with proper experience and not just credits. Gold records and a Grammy do not equal experience. I know, as a trainer for Sequoia now for 5+ years, I am still amazed at the lack of experience and knowledge some of the people I've trained have, yet they have Gold and Platinum albums hanging on the wall.
Once you have the right engineer, someone with knowledge and experience that fits your needs, let him do what he does best. A friend of mine is a doctor and told me all about patients coming into his office and telling him their diagnosis and what he needs to do, that they had read it on the internet... How absurd! If they thought he needed to be told what to do, why are they there? But it happens in the studio too. You need to trust the fact that the engineer you picked has the experience and know-how to do what you hired him or her to do.
Picking studio musicians and players.
I always say, let the professional do what they do best, and with session musicians and players you always get the best results by doing this.
For example, I give a drummer the basic grooves that I need him to lay down, then I let them do that voodoo that he do so well. This is what they do, and their enhancements to my basic ideas will be way better then what I could have envision, you know?
I have played guitar on hundreds of releases, you probably know my background. I was tracking an acoustic guitar solo on a song and the client instructed me to the point were it sounded like a horrible solo done with a keyboard. They even at one point said "I don't think it should be played like that, a guitar player wouldn't do that."
Other clients have brought me simple solos to redo that they had played but wanted done better, but then would not let me do anything other than note for note exact reproduction of what they did. Imagine what the song and solo could have been like if they had allowed me to do my thing.
I'll leave you with this.
Remember if you have chosen a person to be part of your team, you need to trust what they do, otherwise you really do not have a team and you will be unhappy and frustrated, along with frustrating everyone around you through out the project.
Friday, September 11, 2015
My Flow: The journey of sound at Eclectica Studios
By Tim Dolbear
www.timdolbear.com
I was asked to go a little in depth about the signal flow here at Eclectica Studios.(www.eclecticarecordings.com)
It's really straight forward once you use it, but it may seem a little overwhelming at first... so lets dive in...
I currently have 12 mic lines on my wall jackplate in live room feeding into the control room and directly into the corresponding preamp for the feed. No patchbay, if you want to use the Manley mic pre, you plug into feed #9 on the live room panel.
My current preamps:
-Manley 40db, 1 channel
-Great River MP-2NV, 2 channels with the GR EQ-2NV inserted
-Altec 8 channel mod'd preamp from 1979 called the MASH unit (Microphone amplification system housing)
Each Preamp feeds its own compressor and the compressors feed an Apogee AD-16 analog to digital converter (not the rosetta, the original sounded better IMO). The AD-16 feeds optically the ADAT ins on the RME 9652 and 9632 interfaces that work as a single interface. I work at 96k sample rate so there are 4 channels per optical line.
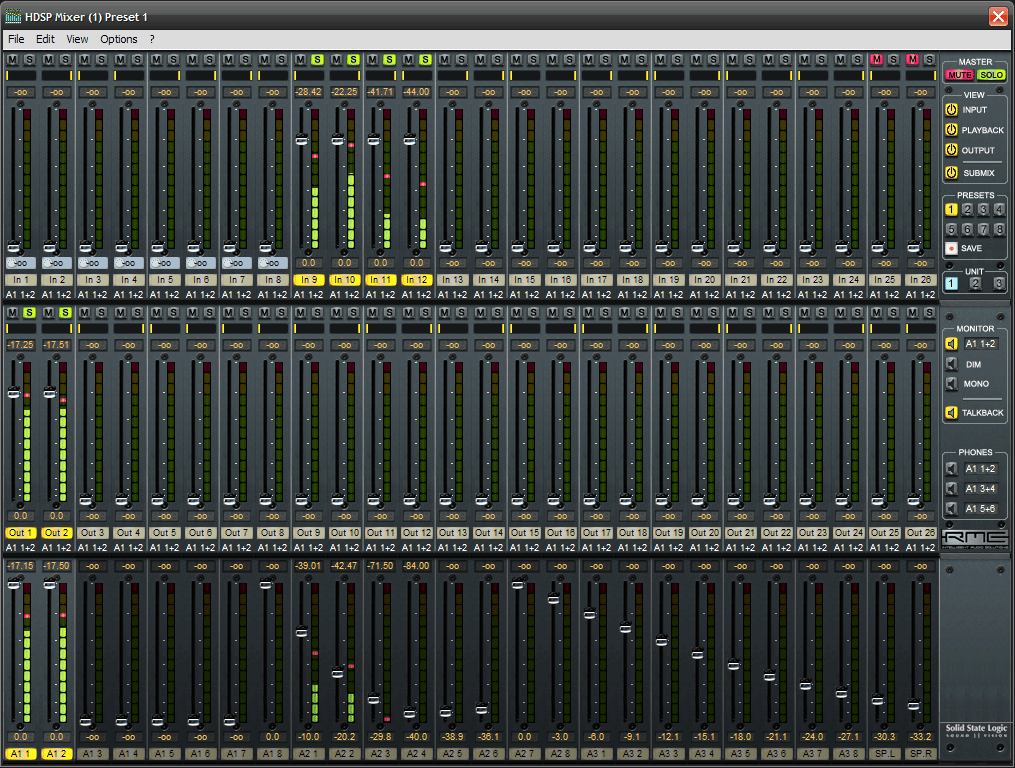
I use RME's Totalmix nowadays instead of a real console. It handles all my routing, TB, cue and CR monitoring... It allows me to save mixer setups and recall session setups on the fly. It stays open on my 2nd monitor.
Liveroom headphone amp is fed from the RME 9632's analog out (the Cue mix). The Control Room (CR) is feed from the 9652 optical out to the Mytek Stereo 192DSD.
My Mixbuss: While tracking and editing in Sequoia, the master out normally feeds outputs 1-2 of the 9652 to the Mytek Stereo 192DSD. For mixing I switch Totalmix to a different setup (Preset) and feed Sequoia's master out to outputs 5-6 which send out to a Mytek Stereo 96. This D/A converter feeds the Great River EQ-2NV which then feeds the Apogee AD16 inputs 12-13 and are recorded onto a track in the project, printed as the Mix. Inputs 12-13 also then feed back out to the Mytek Stereo 192DSD for monitoring in the CR of the mix buss loop.
The GR EQ-2NV has 2 ins and outs pre channel. When used with the MP-2NV preamp, the preamp has a insert designed for the EQ-2NV that places the EQ in the proper signal path prior to the output transformer creatin a perfect "Channel strip" circuit. There is also a set of XLR in/outs on the EQ and a switch on the front that allows you to change between the mic pre insert and the XLR connection, very cool!! So for tracking, its set for the micpre insert, for mixing and mastering it is set to the XLR ins and outs.
Here is the breakdown:
Manley 40db, feeds switch that allows it to go to Ashley SC55 (1981) into the AD16 ch 9
GR MP-2NV, ch 1 feeds Ashley SC-55(1981) into AD16 ch 10,
GR MP-2NV, ch 2 feeds switch, allowing it to feed SC55 into AD16 ch11
Altec preamp "MASH Unit"
ch 1 feeds a Ashly CL-50(mid 1980s)
ch 2 feeds a Ashly SC-50(mid 1980s)
ch 3 straight in
ch 4 straight in
ch 5 + 6 Room mics or overheads, feeds Ashly CL-52 (mid 1990s)
ch 7,8 straight in
...these feeding AD16 1-8
Simple, straight through workflow. Want to track a vocal through the GR preamp? Plug the vocal mic into the input in the live room and arm the track for the input in Sequoia. Done. Adjust the Preamp and compressor.
Now go make some music!
www.timdolbear.com
I was asked to go a little in depth about the signal flow here at Eclectica Studios.(www.eclecticarecordings.com)
It's really straight forward once you use it, but it may seem a little overwhelming at first... so lets dive in...
I currently have 12 mic lines on my wall jackplate in live room feeding into the control room and directly into the corresponding preamp for the feed. No patchbay, if you want to use the Manley mic pre, you plug into feed #9 on the live room panel.
My current preamps:-Manley 40db, 1 channel
-Great River MP-2NV, 2 channels with the GR EQ-2NV inserted
-Altec 8 channel mod'd preamp from 1979 called the MASH unit (Microphone amplification system housing)
Each Preamp feeds its own compressor and the compressors feed an Apogee AD-16 analog to digital converter (not the rosetta, the original sounded better IMO). The AD-16 feeds optically the ADAT ins on the RME 9652 and 9632 interfaces that work as a single interface. I work at 96k sample rate so there are 4 channels per optical line.
I use RME's Totalmix nowadays instead of a real console. It handles all my routing, TB, cue and CR monitoring... It allows me to save mixer setups and recall session setups on the fly. It stays open on my 2nd monitor.
Liveroom headphone amp is fed from the RME 9632's analog out (the Cue mix). The Control Room (CR) is feed from the 9652 optical out to the Mytek Stereo 192DSD.
My Mixbuss: While tracking and editing in Sequoia, the master out normally feeds outputs 1-2 of the 9652 to the Mytek Stereo 192DSD. For mixing I switch Totalmix to a different setup (Preset) and feed Sequoia's master out to outputs 5-6 which send out to a Mytek Stereo 96. This D/A converter feeds the Great River EQ-2NV which then feeds the Apogee AD16 inputs 12-13 and are recorded onto a track in the project, printed as the Mix. Inputs 12-13 also then feed back out to the Mytek Stereo 192DSD for monitoring in the CR of the mix buss loop.
The GR EQ-2NV has 2 ins and outs pre channel. When used with the MP-2NV preamp, the preamp has a insert designed for the EQ-2NV that places the EQ in the proper signal path prior to the output transformer creatin a perfect "Channel strip" circuit. There is also a set of XLR in/outs on the EQ and a switch on the front that allows you to change between the mic pre insert and the XLR connection, very cool!! So for tracking, its set for the micpre insert, for mixing and mastering it is set to the XLR ins and outs.Here is the breakdown:
Manley 40db, feeds switch that allows it to go to Ashley SC55 (1981) into the AD16 ch 9
GR MP-2NV, ch 1 feeds Ashley SC-55(1981) into AD16 ch 10,
GR MP-2NV, ch 2 feeds switch, allowing it to feed SC55 into AD16 ch11
Altec preamp "MASH Unit"
ch 1 feeds a Ashly CL-50(mid 1980s)
ch 2 feeds a Ashly SC-50(mid 1980s)
ch 3 straight in
ch 4 straight in
ch 5 + 6 Room mics or overheads, feeds Ashly CL-52 (mid 1990s)
ch 7,8 straight in
...these feeding AD16 1-8
Simple, straight through workflow. Want to track a vocal through the GR preamp? Plug the vocal mic into the input in the live room and arm the track for the input in Sequoia. Done. Adjust the Preamp and compressor.
Now go make some music!
Tuesday, September 8, 2015
My new review for the UAD Neve 88RS and Marshall Plexi - MIX Magazine Sept 2015
By Tim Dolbear
www.timdolbear.com
My new review in MIX magazine for the new UA 88RS collection and Marshall Plexi is available. Have a read at:
https://www.mixonline.com/news/plug-ins/universal-audio-uad-2-plug-ins/425570#sthash.iBCxkPlg.dpuf
www.timdolbear.com
My new review in MIX magazine for the new UA 88RS collection and Marshall Plexi is available. Have a read at:
https://www.mixonline.com/news/plug-ins/universal-audio-uad-2-plug-ins/425570#sthash.iBCxkPlg.dpuf
Enjoy!
Wednesday, August 26, 2015
How to naturally add textures to your drum recordings.
By Tim Dolbear
www.timdolbear.com
So there are 2 mics I use to add a trashy-ness to a otherwise beautifully recorded drum track. Now I know there are lots of plug-ins and toys where you add distortion and compression to the sound to trash them up a bit so they sound more "rock 'n roll" but why fake it? I prefer to address it naturally by using a trashy sounding mic and adding it in under the drum tracks during mix.
Here's what I do; When I track drums for a rock song or any song I think may need this, I set up one of my 2 favorite mics for this trickery as a secondary overhead and record it to its own track. Once done I have it along with the normal mics all tracked out on separate tracks: Kick, Snare, Overheads, Tom, Floor tom, and trashy mic. Then during mix after I have the drums sounding good and balanced I bring up the trashy mic's fader until it flavors the sound just how I want.
The 2 mics I use are:
The America D4T mic from the late 1930's; complete trashy sound.
The Turner U9SA from the 1940's with its Paper diaphragm; sounds like an old Glenn Miller recording. Yes, I still have the original tags and box.

So, how does it sound?
In these examples, I am using the Turner Mic set up directly above the snare about 4 ft up. Its plugged into a Manley Mic pre and a Ashly SC55 compressor with a 7:1 ration and about 4-6db of reduction.
The Example 1 first plays just the solo'd Turner Mic track, then just the normal drum tracks and at 14sec the turner track is unmuted and you hear them blending. The Turner is just tucked in under the normal tracks to add some MIDs and trashiness to the mix. Example 2 simply goes back and forth with the Turner on and off. These are the unEQ'd and unmixed drums. Just the raw tracks from the tracking session.
Example 1 wave file 22secs 44.1 16bit
Example 2 wave file 38secs 44.1 16bit
Example 3 Turner mic solo'd
Its subtle in the mixed in examples, but effective in a mix.
One last note, watch for phase issues, flip the phase on your trashy mic back and forth till you fine a blend you like, also move it around if needed so when it's mixed in with the other mics it relates to them well.
Now, go make some music!
www.timdolbear.com
So there are 2 mics I use to add a trashy-ness to a otherwise beautifully recorded drum track. Now I know there are lots of plug-ins and toys where you add distortion and compression to the sound to trash them up a bit so they sound more "rock 'n roll" but why fake it? I prefer to address it naturally by using a trashy sounding mic and adding it in under the drum tracks during mix.
Here's what I do; When I track drums for a rock song or any song I think may need this, I set up one of my 2 favorite mics for this trickery as a secondary overhead and record it to its own track. Once done I have it along with the normal mics all tracked out on separate tracks: Kick, Snare, Overheads, Tom, Floor tom, and trashy mic. Then during mix after I have the drums sounding good and balanced I bring up the trashy mic's fader until it flavors the sound just how I want.
The 2 mics I use are:
The America D4T mic from the late 1930's; complete trashy sound.
The Turner U9SA from the 1940's with its Paper diaphragm; sounds like an old Glenn Miller recording. Yes, I still have the original tags and box.
So, how does it sound?
In these examples, I am using the Turner Mic set up directly above the snare about 4 ft up. Its plugged into a Manley Mic pre and a Ashly SC55 compressor with a 7:1 ration and about 4-6db of reduction.
The Example 1 first plays just the solo'd Turner Mic track, then just the normal drum tracks and at 14sec the turner track is unmuted and you hear them blending. The Turner is just tucked in under the normal tracks to add some MIDs and trashiness to the mix. Example 2 simply goes back and forth with the Turner on and off. These are the unEQ'd and unmixed drums. Just the raw tracks from the tracking session.
Example 1 wave file 22secs 44.1 16bit
Example 2 wave file 38secs 44.1 16bit
Example 3 Turner mic solo'd
Its subtle in the mixed in examples, but effective in a mix.
One last note, watch for phase issues, flip the phase on your trashy mic back and forth till you fine a blend you like, also move it around if needed so when it's mixed in with the other mics it relates to them well.
Now, go make some music!
Tuesday, August 4, 2015
Cables and the re-appearance of Tone. The Colossal Cables Review
This is part 2 of Cables, connectors, patch-bays, pedals, and the disappearance of tone: Go to Part One
By Tim Dolbear
www.timdolbear.com
My good friend Paul Martinez told me about a cable company here in Austin called Colossal Cables that is selling world wide and gaining some real attention in the musician and studio world and the Audiophile world. He wanted me to meet the owner of the company Brian Mendes and check out what he was doing. So in late July we all went out for a meal and Brian brought me a few samples to check out.
He gave me his new prototype 20ft XLR Mic cable, a guitar cable called Sweet Fats, and a short speaker cable. All built very well with the finest ingredients and rapped in a cut resistant fabric. I tested these out against what I normally use which is mostly Monster and Mogami cables. I tested both in my live rig and studio here at Eclectica Studios.
I started my testing by plugging in my Republic 50 watt tube head into my 1974 Marshall with well broken in Greenback 25watt reissue speakers, using this massive but short speaker cable from Colossal Cables. Then I unrolled the two similar length guitar cables: My Monster instrument cable and the Colossal Sweet Fats cable. Each cable I then rapped around the handle of the Amp and the other end around my guitar strap so I could quickly swap between these instrument cables.
The monster cable I had always used and even showed off in Part 1 of this article about cables sounded in comparison to the Colossal cable like a old cassette recordings and worst yet, the touch and feel of playing through it now felt like I had a dying tube in the input section of the Amp. What in the world? Just swapping between the two cables, Monster and Colossal Sweet Fats was disheartening to say the least. The Colossal cable had taken the sound and feel to a new level.
When you go from a Pro-Co or Belden guitar cables to a Monster cable there is a big difference, less mid sounding and more highs, but going to a Colossal Sweet Fats from the Monster cable was more then just a better EQ curve. Yes, the highs now sounded like a Low-Pass (High Cut) filter had been removed from my sound and the Mids had changed completely becoming solid, present, clear... But beyond the EQ change, the touch of playing the guitar changed. Hard to describe unless you are a player, but imagine the different between driving a car with 4 really low filled almost flat tires verses driving with them properly inflated.
Next I tested the Speaker cable. Now remember that speaker cables are not shielded as instrument or mic/line cables are, as those types carry and a very small amount of voltage, sometimes less than a watch battery's voltage... a speaker cable carries AC electricity and instead of micro-watts, they carry 10, 50, 100 or even 1000 watts.
Though the Colossal speaker cable is built like a tank which is a plus for working musicians, it did not sound much different really to my standard 16 guage 4ft cable I normally use. Note: The speaker cabinet does play a part in this as guitar speakers only produce usable frequencies up to about 5k. Looking at a Spectral display of the frequency response of the recording, there is nothing coming out above 15k and from 5K to 14k, the level dropped from -30db to -90db steeply. So using this speaker cable on a full range speaker system or PA will give a different result.
I thought the 2 different speaker cables sounded different in the room while testing but this is why I record everything and listen back unbiased by visuals and excitement. On playback I am not hearing much difference. With lots of distortion set on the amp (High Gain), there may be a slight bit of upper harmonics coming though better, but setting the amp to a clean/bluesy sound, I don't hear a difference. I included this example too in the Test Files.
I then tested the Mic Cable, again great build quality, and the sound was again, revealing and Amazing! Using the Colossal XLR (still in beta at this time but you can special order them) added not only a nicer, truer frequency response but the resolution came alive. It reminded me of the first time I used my Manley Preamp, which was my first REAL quality preamp, and could not believe the resolution and depth that it pulled from the microphone. This cable did the same thing. In the example you can hear more of the "room sound" in the signal the mic captured. Amazing! Instead of the mic sounding like it's flat against the cabinet, suddenly there is depth and life.
Here is the kicker... the 20ft XLR Mic cable, is plugged into my wall box that is wired into my preamps in the control room, about 20FT from the panel. The cables I used are all good quality (Mogami)but still, they are in the chain of cables in the listening test, as the signal flows: Mix>Colossal XLR>Panel>Mogami runs>Preamp. So just replacing the 20ft run that is in the live room, between the Mic and the Panel yielded this amazing improvement.
Lastly I tested the guitar cables again, this time my Gibson J100Extra with a LR Baggs LB6 pickup. The guitar, like all my acoustics, has no preamp inside the guitar, instead I use a Steward Active DI box. This means that a 1 million ohm signal, or very tiny almost non-existing voltage is leaving the guitar and traveling to the DI box where it is amplified up to Mic level. A good test for cables. In comparison to the monster cable, the Colossal Sweet Fats cable sounds more extended, again as if again a low-pass filter or high-cut filter had been removed. The smooth extend highs are really the most noticeable part to the improvement. I got similar results from testing my Fender Bass direct line into the Great River Preamp.
So, in conclusion, Its not a small difference, but a very big improvements using Colossal cables. These are a big step up in sound quality and in capturing the true sound, but they are not cheap... most in the $100+ per cable...and I purchased a lot of cables last night and I have more still I want to get such as to replace my room mic runs. In addition to the XLR Mic and the guitar cables, I also bought new lines cables to replace the runs from my Mytek Stereo 192DSD D/A converter to my powered monitors. Even though the runs are a higher voltage (+4 professional line level) I am hoping there is the same type of improvement. I will write about how that goes in a followup soon!
Now, Go make some music!
Download Test Files HERE (44.1k 16bit files, SRC by Saracon) 35Meg Download
UPDATE:
Today I received my cables for the monitor section allowing me to hook up the Mytek Stereo 192DSD directly through to my Neumann Monitoring. The difference is noticeable across the entire frequency spectrum, sound is more present, and the depth and resolution are all better now. This means that the new cable do make a difference even when running a +4 professional line level through them.
Now the consideration of swapping out more cable runs and I am already saving my dollars to do just that. This is an great way to upgrade your studio at its very foundation. I seriously recommend buying a Guitar or Mic ColossalFat cable and trying it out. As the example show, its not a subtle improvement, its a BIG improvement.
:-)
By Tim Dolbear
www.timdolbear.com
My good friend Paul Martinez told me about a cable company here in Austin called Colossal Cables that is selling world wide and gaining some real attention in the musician and studio world and the Audiophile world. He wanted me to meet the owner of the company Brian Mendes and check out what he was doing. So in late July we all went out for a meal and Brian brought me a few samples to check out.
He gave me his new prototype 20ft XLR Mic cable, a guitar cable called Sweet Fats, and a short speaker cable. All built very well with the finest ingredients and rapped in a cut resistant fabric. I tested these out against what I normally use which is mostly Monster and Mogami cables. I tested both in my live rig and studio here at Eclectica Studios.
I started my testing by plugging in my Republic 50 watt tube head into my 1974 Marshall with well broken in Greenback 25watt reissue speakers, using this massive but short speaker cable from Colossal Cables. Then I unrolled the two similar length guitar cables: My Monster instrument cable and the Colossal Sweet Fats cable. Each cable I then rapped around the handle of the Amp and the other end around my guitar strap so I could quickly swap between these instrument cables.The monster cable I had always used and even showed off in Part 1 of this article about cables sounded in comparison to the Colossal cable like a old cassette recordings and worst yet, the touch and feel of playing through it now felt like I had a dying tube in the input section of the Amp. What in the world? Just swapping between the two cables, Monster and Colossal Sweet Fats was disheartening to say the least. The Colossal cable had taken the sound and feel to a new level.
When you go from a Pro-Co or Belden guitar cables to a Monster cable there is a big difference, less mid sounding and more highs, but going to a Colossal Sweet Fats from the Monster cable was more then just a better EQ curve. Yes, the highs now sounded like a Low-Pass (High Cut) filter had been removed from my sound and the Mids had changed completely becoming solid, present, clear... But beyond the EQ change, the touch of playing the guitar changed. Hard to describe unless you are a player, but imagine the different between driving a car with 4 really low filled almost flat tires verses driving with them properly inflated.Download Test Files HERE (44.1k 16bit files, SRC by Saracon) 35Meg Download
Next I tested the Speaker cable. Now remember that speaker cables are not shielded as instrument or mic/line cables are, as those types carry and a very small amount of voltage, sometimes less than a watch battery's voltage... a speaker cable carries AC electricity and instead of micro-watts, they carry 10, 50, 100 or even 1000 watts.Though the Colossal speaker cable is built like a tank which is a plus for working musicians, it did not sound much different really to my standard 16 guage 4ft cable I normally use. Note: The speaker cabinet does play a part in this as guitar speakers only produce usable frequencies up to about 5k. Looking at a Spectral display of the frequency response of the recording, there is nothing coming out above 15k and from 5K to 14k, the level dropped from -30db to -90db steeply. So using this speaker cable on a full range speaker system or PA will give a different result.
I thought the 2 different speaker cables sounded different in the room while testing but this is why I record everything and listen back unbiased by visuals and excitement. On playback I am not hearing much difference. With lots of distortion set on the amp (High Gain), there may be a slight bit of upper harmonics coming though better, but setting the amp to a clean/bluesy sound, I don't hear a difference. I included this example too in the Test Files.
Test System:
Amp Mic: Audix D1
Room Mic: sE5 matched set (Room mics not provided in test files)
Preamp: Great River MP-2NV + EQ-2NV(Bypassed)
Compressor: Ashly SC55 (compression off)
AD: Apogee AD16
DA: Mytek Stereo192DSD
DAW: Sequoia running at 96K
Monitoring: Neumann 120/Sub
![]() |
| 1974 Marshal Slant cabinet, D1 mix(Colossal XLR not Picture) |
Here is the kicker... the 20ft XLR Mic cable, is plugged into my wall box that is wired into my preamps in the control room, about 20FT from the panel. The cables I used are all good quality (Mogami)but still, they are in the chain of cables in the listening test, as the signal flows: Mix>Colossal XLR>Panel>Mogami runs>Preamp. So just replacing the 20ft run that is in the live room, between the Mic and the Panel yielded this amazing improvement.
Lastly I tested the guitar cables again, this time my Gibson J100Extra with a LR Baggs LB6 pickup. The guitar, like all my acoustics, has no preamp inside the guitar, instead I use a Steward Active DI box. This means that a 1 million ohm signal, or very tiny almost non-existing voltage is leaving the guitar and traveling to the DI box where it is amplified up to Mic level. A good test for cables. In comparison to the monster cable, the Colossal Sweet Fats cable sounds more extended, again as if again a low-pass filter or high-cut filter had been removed. The smooth extend highs are really the most noticeable part to the improvement. I got similar results from testing my Fender Bass direct line into the Great River Preamp.
So, in conclusion, Its not a small difference, but a very big improvements using Colossal cables. These are a big step up in sound quality and in capturing the true sound, but they are not cheap... most in the $100+ per cable...and I purchased a lot of cables last night and I have more still I want to get such as to replace my room mic runs. In addition to the XLR Mic and the guitar cables, I also bought new lines cables to replace the runs from my Mytek Stereo 192DSD D/A converter to my powered monitors. Even though the runs are a higher voltage (+4 professional line level) I am hoping there is the same type of improvement. I will write about how that goes in a followup soon!
Now, Go make some music!
Download Test Files HERE (44.1k 16bit files, SRC by Saracon) 35Meg Download
UPDATE:
Today I received my cables for the monitor section allowing me to hook up the Mytek Stereo 192DSD directly through to my Neumann Monitoring. The difference is noticeable across the entire frequency spectrum, sound is more present, and the depth and resolution are all better now. This means that the new cable do make a difference even when running a +4 professional line level through them.
Now the consideration of swapping out more cable runs and I am already saving my dollars to do just that. This is an great way to upgrade your studio at its very foundation. I seriously recommend buying a Guitar or Mic ColossalFat cable and trying it out. As the example show, its not a subtle improvement, its a BIG improvement.
:-)
Subscribe to:
Posts (Atom)